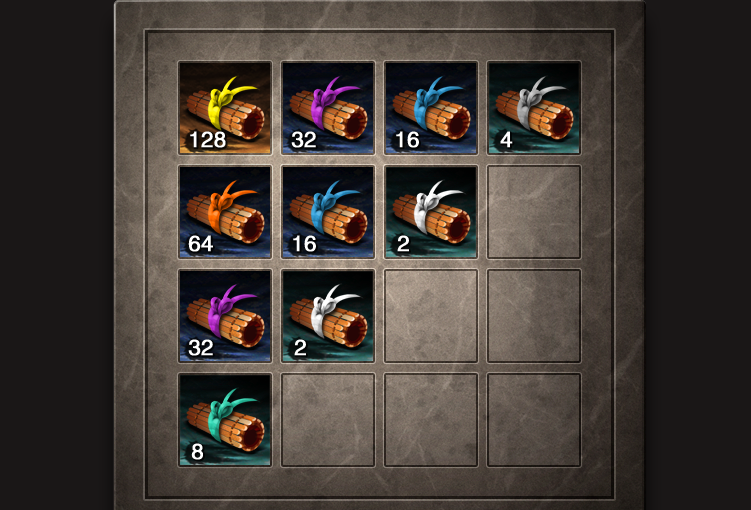
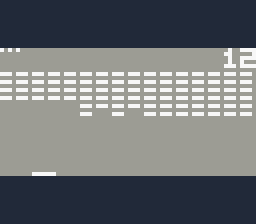
In Age of Wushu, there’s a weekly quest called “Compile the scripts”. It features a minigame where you have to compile scripts until you have either 128 or 256 scripts, depending on the difficulty of the quest. One look at the minigame and you can already see that it’s actually a clone of a certain game.
Pictured: makefile compiler scripts
Even though I am familiar with this game, I never really was interested in going all the way to 2048. It’s just not my type of game, to be honest. I just play it because the quest rewards benefit me. During the gameplay, I just repeatedly mash the left and up buttons to speed through the quest, as it requires me to reach 128/256 only.
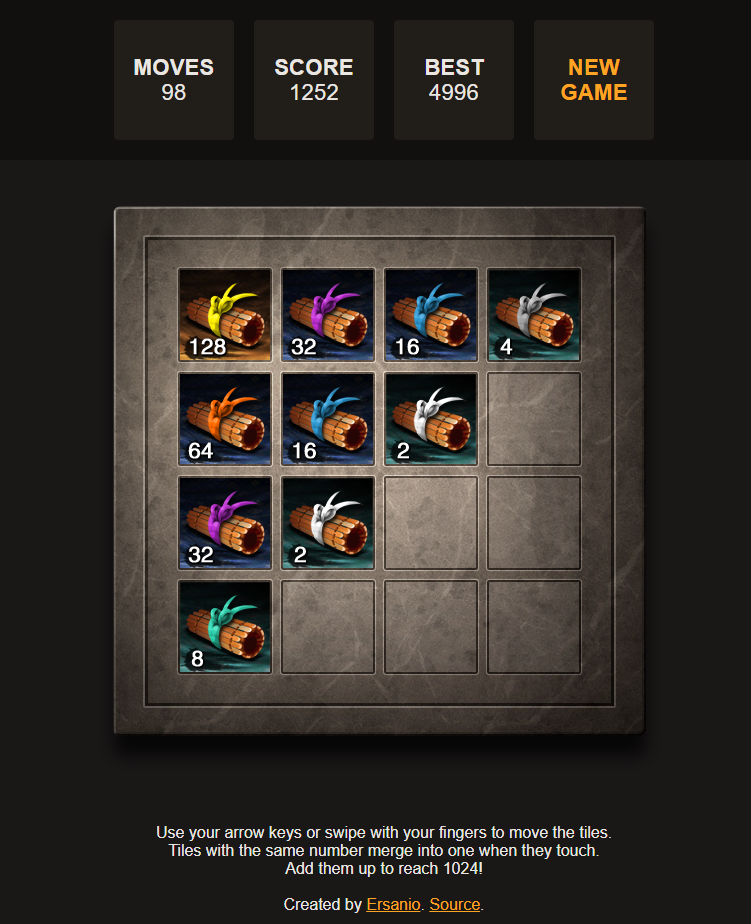
Some people thought otherwise. So far I’ve had 4 friends independently expressing their admiration for this minigame and how it’s more fun compared to the other tedious quests. Some already know that it’s based on the 2048 minigame, but they still like the overall “Age of Wushu” theme of it. It was actually a bit sad to think about. My friends are limited to playing the game twice a week. They have to actually log into Age of Wushu to play it. The game won’t even let them go all the way to 2048. So I decided to take matters into my own hands and make my own web-based version of this minigame.
Picking a front-end framework
I decided to make the application in Angular, as it ties in neatly with my wishlist of programming languages and frameworks I’d like to learn. This will be my second Angular application (the first one I will blog about in the next post #foreshadowing). Building the user interface was actually easier compared to programming the game logic.
I decided to add support to both desktop and mobile. To do this, I first set the viewport size to 0.5, else the game’s grid asset wouldn’t fit on mobile. Doing that caused inconsistencies when it came to font size styling however, so I decided to be less lazy about it. After making use of CSS variables and the calc() function, I made it so that the assets scale depending on a single scale variable. On smaller screens, the variable is set to 0.5 – halving the assets in image size. On larger screens, it’s set to 1 – the original image size of the assets.
I also made a single “spritesheet” asset of the tiles, as using a separate image for each tile value would sometimes cause the tiles to have delays when appearing into the game. This was especially true for tiles that weren’t loaded in the game before and appeared just then. This spritesheet approach also taught me about the Math.log2() function which turned out to be extremely useful for this project.
The spritesheet
That’s also when I found out that the tiles only go up to 1024 in Age of Wushu, rather than 2048.
Writing the game logic
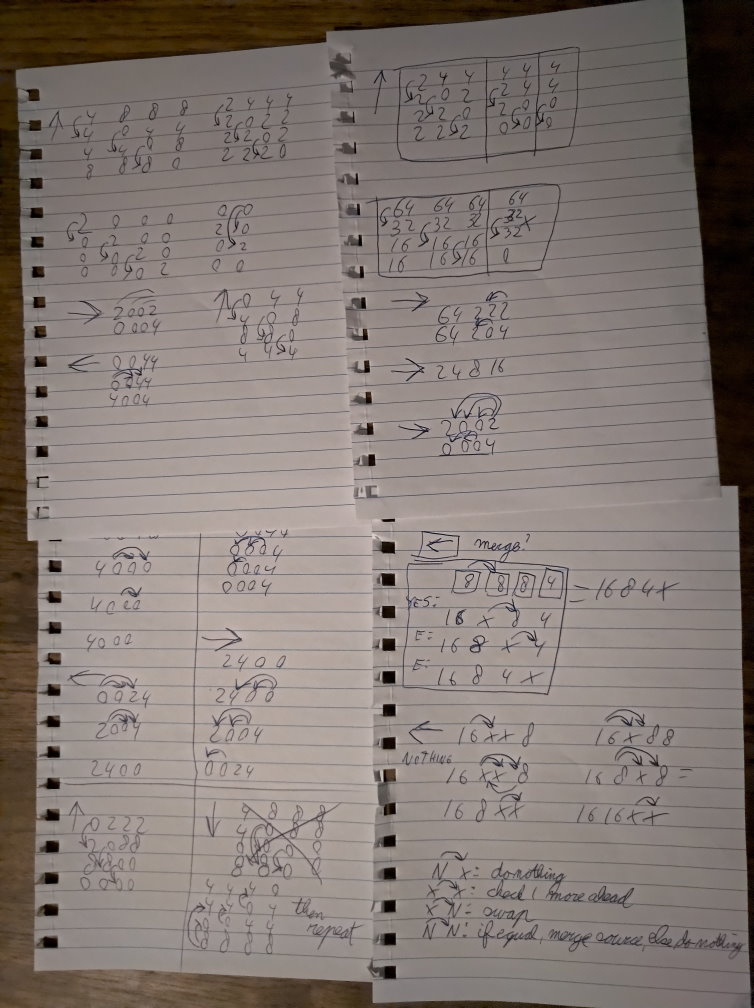
This was the tougher part of the game, as I actually had to figure out how the game’s rules exactly worked. I couldn’t really find any specifications for the 2048 game, so I had to play around with the game, to figure out the following rules. The most important of them are:
Pressing an arrow key moves all tiles to the respective direction, making them occupy empty tiles
A tile with a value that moves into a tile with the same value merge into a new tile with the value multiplied by 2, regardless of there being a gap between those two tiles or not. This is a promoted tile.
A promoted tile cannot be used in a merger. This prevents situations like 2 2 4 8 -> 0 0 0 16 from occuring. The correct end situation would be 0 4 4 8 in that case.
After a lot of sketching I started to see a pattern.
After that, it was just a matter of putting that pattern into code. It’s a bit hard to explain, but it basically boiled down to processing the tiles column by column based on the direction and applying above rules to each column. To be extra sure I got the rules right, I also wrote unit tests which test if the resulting grid is correct after a certain move.
Finishing touches
I added mobile swiping support by using HammerJS. To implement this, I had to do the following:
npm i hammerjs
import 'hammerjs'; in main.ts
make an index.d.ts and add declare module 'hammerjs'; to it
Add HammerModule to app.module.ts
After that, I could simply add event handlers in the .html and .ts files, such as (swipeup). I had to add extra configuration in order to add support for swiping in all directions, as it doesn’t support vertical swiping out of the box. You can find it in HammerConfig.ts.
I also made use of the browser LocalStorage to keep track of the player’s (high)score and the current state of the game. The player can leave the game at any time they want; when they return to the game, they can resume where they left it off.
Conclusion
Making this game for the web was a nice practice for me especially when it came to implementing mobile support. With a single library, I could implement mobile gestures and I can see this experience being useful in the future.
Implementing the game logic was especially challenging considering I sort of reverse-engineered the gameplay based on my observations. Admittedly I did look at existing source code on sites like codepen, but seeing how everyone had their own implementation, I wanted to have my own original approach as well.
Unfortunately the game is lacking in animations right now compared to that original 2048 game. Maybe it’s something I’ll work on in the future.
But hey, at least, now my friends can enjoy their Age of Wushu-themed 1024 game!
Age of Wushu is a free-to-play* 3D martial arts action MMORPG, developed by Chinese company Snail. The game revolves around the Wuxia-inspired lore surrounding martial arts and adventures in Ming Dynasty China. (* “freemium” is more accurate)
I’ve been playing this game for the past few years and have chatted with a lot of players in the process. One crippling issue this game has, is the direct message (DM) history system.
The game keeps the chat logs locally, stored within an XML file, per account. Every string within this XML file is encoded in some way. Every time a new message arrives or is sent, the game writes to this XML file. This becomes a big issue on slower harddrives, when you have to deal with chat logs that are a few megabytes in size. Although a few megabytes sounds trivial, the game actually runs this disk write process on what I can only assume the main thread. Every time a new message comes in, the game actually freezes for a few frames (really). There were days where people started spamming your DM just to cripple your gameplay during a monthly martial arts tournament.
To solve this, people generally just went to their Age of Wushu installation directory, and deleted their XML file. But me being me, I never threw them away. I know the chat logs are stored in some kind of encoded format and thought it’d be fun to crack it and look back at the chat logs one day.
A small portion of the chat log files.
On the 28th of December, I was determined to finally figure out the format.
The XML format
Upon inspecting an XML file, you are immediately greeted with garbled characters (for the untrained eye).
During experimentation, I found out that
A “Record” is a chat session with another player
An “Item” is a chat message
An item’s chat content is always prepended with the string "2z3SMQ473PHc3bZO3Py9KHyZomCR3lyZjmAtKIvnjeLOJzASMzyU2aJcjelcjPueJO0[" for some reason
An item’s chat content is also appended with "25yPMeYZ2cxOGOg[" or "[2zvUFsW=".
I also decompiled the game’s Lua files in order to find the functions that handle chat history. The chat window seems to make calls to two functions:
There is a function which changes a widestring into the UTF8 charset, then proceeds to call an external function within the game’s DLLs in order to “encrypt” the string. There’s also a function which does the opposite.
The padding with the "="-character does suggest this encryption is Base64, but I’ve never seen the character "[" used in Base64 before. Running Base64 strings through a Base64 decoder gave me false results. Take the Base64 string "CmvsjXYqMUnIC5D=" for instance. I know for a fact that this says "Ersanio(GD)", yet a Base64 decoder gives me "kv*1I ".
Somewhat more confused with the introduction of “widestring” and the false Base64 results, I presented this problem to p4plus2’s Discord guild, snesdev. Although it’s called “snesdev”, the folks there have great interest in various programming-related topics in general.
I gave xfix, randomdude999, Alcaro and p4plus2 some example Base64 strings with some character names and their “Base64” equivalent. They speculated about “XOR cipher”, “lookup table” and “stream cipher” and I had no idea what those meant, serving as a reminder that one day I should look into cryptography. However, eventually, they settled on “Base64 with a shuffled alphabet”.
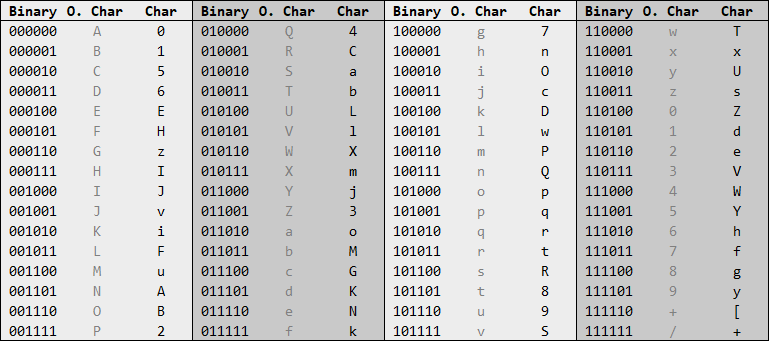
What is Base64?
Basically speaking (no pun intended), Base64 is a way to encode bits and bytes into a string. Since Base64 works with raw bits, it is possible to encode any data thinkable into a string. Think of text or images. When encoding, Base64 processes groups of 6 bits, rather than 8 bits. Every 6 bits are matched with a character. For this, Base64 makes use of some sort of a dictionary.
The Base64 index table
For example, the string "A" encodes into the Base64 string "QQ==". The character "A" is 65 in UTF8, thus "010000 01" in binary, grouped by 6 bits. Append the second group with four zeroes to have two groups of six bits, and you have "010000 010000", which according to the table above, equals to "QQ". We appended the second group with four zeroes just now. Because of this, we communicate this by appending the Base64 string with two "="; one for every two zeroes appended.
Shuffled index table
The thing is, Age of Wushu uses a different index table. The reason why I’ll explain later. I could either reverse engineer the DLL to try figure out the index table, or try to brute-force this shuffled index table. I chose to do the latter, as I have no experience with reverse-engineering actual DLLs.
I started sending one of my alt characters certain messages, so I wouldn’t have to spam a poor random by-passer’s DM with cryptic chat messages. I checked the encoded messages in Age of Wushu’s chat logs, and compared them to the regular Base64-encoded version.
For example, I sent the message "aaaaaaaaa". In Base64, this is "YWFhYWFhYWFh". In Age of Wushu’s shuffled Base64, this is "jXHnjXHnjXHn". Therefore, I know that Y = j, W = X, F = H, h = n. Repeat this for many more strings and you end up filling a shuffled table. To make things easier, randomdude999 gave me a string which hits every single Base64 character when encoded:
He provided me a string which hit every character in the correct order! With this, I could basically make a vertical comparison and fill the shuffled Base64 index table used by Age of Wushu.
Age of Wushu’s shuffled Base64 index table
Using our example of encoding the string "A" into Base64 earlier, this means that using Age of Wushu’s index table, this encodes the bits "010000 01" into "44==". This table also explains why some strings contain the character "[", even though Base64 originally does not have this character.
With this reverse-engineered table, it is finally possible to read the chat logs in a human readable format! There is no need to write a custom Base64 decoder for this; Just use something like Python’s String translate on Age of Wushu’s Base64 string, before running it through a regular Base64 decoder.
Why is the chat encoded?
We saw earlier that chat messages are prepended and appended with mystery Base64 data. Running a line through the custom Base64 decoder produces the following:
This is just my speculation, but I think the developers added this extra hurdle in the Base64 encoding in order to prevent people from editing chat logs and inserting their own custom HTML. The game is hardcoded to filter out the "<" and ">"-characters from any textual input in the game. Although I don’t know what malicious intent people could have by editing their own chat logs, as the opposite party cannot see these edits… but I cannot think of any other reason. Historically speaking, in the earlier versions of the game, it was possible to use the "<" and ">"-characters, allowing players to use links or even embedded images in the chat.
Just for clarification, the game doesn’t actually use HTML as per HTML standards. Rather, it has its own HTML-parsing engine which only recognizes certain tags. For example, I manually encoded a script tag into the chatlogs, and the game did not recognize this.
Conclusion
Age of Wushu uses a shuffled Base64 index table to prevent players from presumably editing their own chat logs in order to inject (malicious) HTML code. Now that this encoding is cracked, I’d say I opened a can of worms, but honestly, being able to read and edit your own chatlogs is harmless I’d say.
I will probably write some sort of web interface which accepts an XML file and outputs readable chat on the screen. Imagine something like WhatsApp’s web interface. No backend server will be needed for this and users won’t have to be worried about their data being uploaded somewhere.
Considering I have several chat logs, I might also write a function which merges these chat files into one, sort of zipping them together, based on the recipients’ names and the moment of the sent messages.
This will be a good opportunity to practice TypeScript and Angular. I’ll open source the program on GitHub eventually.
In this post, I’ll be talking a bit about my final university project to get my bachelor’s degree. But first, there’s something that really bothers me, which I’d like to address first.
Terminology mishaps
I recently tweeted that I finally got my Bachelor of Science certificate, although I had a little bit of a trouble with picking names. First, I call it a “Bachelor’s degree in Information and Communications Technology”.
At some point I also started calling the institution I attended a “college”, but it seems that it’s actually called a “university of applied sciences”.
This inconsistency is mainly because of the education system being in Dutch, and it’s hard for me to find internationally accepted equivalent terminologies to what I’ve attended. In order to make things more official, I looked at my certificate’s addendum because there, everything’s written in an internationally accepted English format. Handy if I ever decide to move to a foreign country one day.
To make this finally official, once and for all: I got my Bachelor of Science certificate for the study “Information Technology” at a “university of applied sciences”. I have already thanked my instructors, family as well as friends, for their (emotional) support and guidance. I’m not sure if I would’ve made it, if it wasn’t for their encouragement.
In simpler words: I can officially write software professionally.
Anyway, the final project
In order to graduate, I had to work on what the university calls a “Final Project”. This was basically an internship of 5 months, working on an original assignment at a software development company. The final project at the company can be described as an Internet of Things (IoT) project:
“Delve into the inner workings of Azure IoT Hub and create a proof of concept (PoC) application making use of this service, to prove the power of Cloud IoT-technology; fast deployment and little overhead for the developers.”
The PoC that I had to develop, can be described as following: “Work on an IoT solution called ‘De Slimme Sportpaal’ (‘The Smart Sporting Pole’). The device can be deployed in public parks and the likes where people in proximity can ‘sign in’ using a dedicated mobile app, in order to jog through a predetermined route. Based on people’s activity and performance, they’ll get recommendations about other similar people whom they can meet up with. They can then jog together and have a jolly time!”
This PoC combined with the description of the final project is quite a broad use case, as there are multiple technologies involved. What I had to do is basically this:
My solution had to be cloud-native, so I had to look into Microsoft Azure, as I never worked with its services before.
I had to look into the Azure IoT Hub specifically, to understand its inner workings.
I had to look into developing IoT hardware. I had no experience with this, as my study is “Software Development”. IoT leans more towards “Embedded Software Development” which is another study at the university.
I had to look into mobile app development. Until before the internship, I’ve only worked with native Android, native iOS, as well as Xamarin.Forms apps. All of these only once.
I had to design the system, kind of “gluing” together all of the above.
In the past, it was required to write a research paper for your assignment. This time around, they discarded that requirement, allowing me to be fully creative with my solutions.
Project Plan
According to my university, the project plan is the first thing you hand in to the company as well as your instructors. Officially speaking, I had 5 weeks to get my project plan in order. This was organized as follows:
2 weeks for the initial draft.
3 weeks for the final version.
After handing in the initial draft, I had 3 more weeks to finish the final version. This also included waiting for feedback from the instructor and assessor.
My initial draft was the complete project plan, without any missing chapters. I spent 2 full weeks on researching the specifics of the project, as well as researching what a good project plan would look like. Then I applied this knowledge to my draft. I used the university’s template but it’s that: just a template. The content I had to think up myself.
I’ve written the project plan keeping the “client’s point of view” in mind. Clients have questions and concerns that need to be answered clearly and explicitly on paper. I took this to heart, to the point of actually treating the project plan as a contract, between the client and me as a developer. I’ve written the project plan, trying to cover every little detail:
Company background.
Stakeholders of the project and their description (e.g. the client, the end-users).
Services and their description (e.g. Microsoft Azure).
Project goal(s): What’s the problem which lead to this project? How is the problem going to be solved (i.e. what is the project)?
Project results: What will be handed in at the end of the project? A list of documents and artifacts as well as their description. The list also contains the receiving parties. Due to the university-context, I also mentioned that the university would receive certain documents and artifacts for grading.
Project milestones: General list of dates and/or quantized days with milestones (e.g. deadlines, amount of days off, etc.) as well as dismissing possible, optimistic assumptions (e.g. I made it perfectly clear that I’ll assume the “worst case scenario” of the project plan indeed taking 5 weeks).
Conditions and agreements: Conditions to work on the project properly (e.g. services, a company account, additional costs during the project) as well as agreements regarding the actual act of working on the project (e.g. working hours, calling in sick), as well as my communication with the client (e.g. progress reports).
Artifacts and quality: Reference to the “Project results” from earlier, but with the focus on artifact quality requirements, actions to produce said artifacts, and process quality. I also added extra artifacts, such as my thesis and my thesis presentation, with the university as the “client” for those.
Software development process: Short descriptions of possible software development methods (e.g. scrum) and the process of choice, including the reasoning why. The process I choose and possible modifications to this are then further elaborated upon. I also mention crucial tools and services (e.g. Azure DevOps for version control and iteration plans).
Project organization and communication: List of members of this project (stakeholders, instructors) and their contact information. As I’m the sole developer of the project, I also added the standard meeting days and times with the project members.
Planning: General timeline of the project based on the chosen software development method, as well as milestones and if applicable, the general activities within a typical iteration.
Risks: Practically speaking, the project plan should cover everything in such detail that there are no more risks, save for the extreme ones I have no control over (e.g. certain online services being down).
Sources: It’s nice for the client to understand what a “Twin Peak Model” is. Having sources makes your project plan and claims look more credible.
It’s a huge list, I know. But apparently I worked so meticulously on the plan, that one of the instructors at the university decided to use the draft (!) of my project plan as a positive example, for his students. That was very flattering to hear.
Microsoft Azure and The Cloud™
Azure is a Cloud service provided by Microsoft. It runs on dozens of data centers which are distributed across the globe. Azure offers many “building blocks” (i.e. services) to developers, from Virtual Machines to literally just functions (i.e. “serverless”). Interestingly enough, these two building blocks are on the complete opposite ends of the Cloud spectrum:
Image from an article by John Morello. The article explains the different elements of the spectrum and their (dis)advantages.
The concept of “The Cloud” was new to me. Before I started this final project, I never developed things using the Cloud before. In fact, when I thought of the Cloud, I thought about programs such as Dropbox, OneDrive, or this video. This was just the consumer’s point of view though. Consumers don’t (normally) think about how Dropbox works. In my case, I just imagined it’s a bunch of hard drives somewhere connected to the internet and that’s it. There is some truth in this but the Cloud seems to be more than just storage.
The Cloud is continuously expanding and evolving. Look at the amount of services Azure has. Although I have no service growth numbers for Microsoft Azure, here are some for Amazon Web Services. The amount of major features in AWS grew from 159 to 1017 in a matter of five short years. The sky is the limit with the Cloud at the developer’s disposal (pun not intended).
The Cloud makes it easy to develop solutions. I already briefly talked about Virtual Private Servers in a previous post. In my final project, I used services which did more than just hosting a server and data. The major ones I will discuss below.
Azure IoT Hub
Azure IoT Hub is a service which allows the developer to connect IoT devices to Microsoft Azure. It actually serves like some sort of a gateway which can take on really heavy traffic; we’re talking about millions of simultaneously connected devices with millions of events per second.
Try building a server and network which can take on those numbers. It’s too challenging and expensive and you’ll probably just end up DDOSing your network instead unless you make it really robust. My project didn’t require this kind of performance but it had to make use of Azure IoT Hub anyway, to prove a point; that it can be used in production easily for IoT projects.
IoT devices can connect with Azure IoT Hub by making use of the Azure IoT Hub SDKs. They support various languages, allowing a high range of devices to make use of Azure IoT Hub.
As I mentioned earlier, Azure IoT Hub serves as a gateway to Microsoft Azure. Data sent from IoT devices (for example, weather stations) are ingested by the hub. Then, other Azure services, such as Azure Streaming Analytics or Azure Functions can consume the telemetry for further processing using a pub/sub pattern. Which brings us to…
Azure Functions
Azure Functions is the “serverless” solution of Microsoft Azure. Serverless, very shortly described, are basically functions with certain triggers which run in the Cloud. Triggers can vary from simple timers to HTTP requests. The developer doesn’t need to set up or maintain a server (such as Node.js or ASP.NET); Microsoft Azure does this for you. This means that Microsoft Azure takes care of all the overhead, such as software updates, operating system updates, server updates, resource allocation, and so on. All the developer has to do, is writing functions and deploying them.
Azure Functions are tightly integrated with many services of Microsoft Azure. It can receive data directly from Azure IoT Hub or other Azure services. It can also output data to various services, such as Cosmos DB. All I have to do is add some connection strings and some references in the code. I don’t even need to set up the connection manually most of the time; it happens automatically, by making use of attributes, saving me the trouble of writing boilerplate code.
In my project, I mainly used Azure Functions to ingest telemetry from my prototype IoT device, as well as a tiny REST API serving as an abstraction layer over my database of choice. Which brings us to…
Azure Cosmos DB
Azure Cosmos DB is one of the few Cloud database solutions of Microsoft Azure. Azure Cosmos DB stores data in a format called the “atom-record-sequence“, and has 5 APIs which can access said data in different formats: SQL, Document (MongoDB), Key-Value, Graph and Columnar. This is defined on deployment-level, however. You can’t have one deployment use multiple APIs.
The interesting thing about Azure Cosmos DB is that it is schema-less; data (as well as metadata, such as modification timestamp) are stored in JSON-format, meaning you can have nested documents, and each document could differ in format, even if you select the SQL API.
Finally, Azure Cosmos DB can be somewhat of an enterprise/heavy-duty service. It can duplicate data across data centers across the globe meaning the latency to access the data would be low and the data would be continuously backed up.
Designing and validating the architecture
After looking into Azure IoT Hub and how to process its data, the next step for me was finding the right building blocks to design the architecture as well as the integration with my smartphone app.
The process was iterative due to the project management method I chose: Rational Unified Process. Rational Unified Process can be divided into four phases: inception, elaboration, construction and transition. The elaboration phase is used to validate the architecture and having a skeleton/template to use in the construction phase. Although the phases consist of iterations, my process was actually pretty linear.
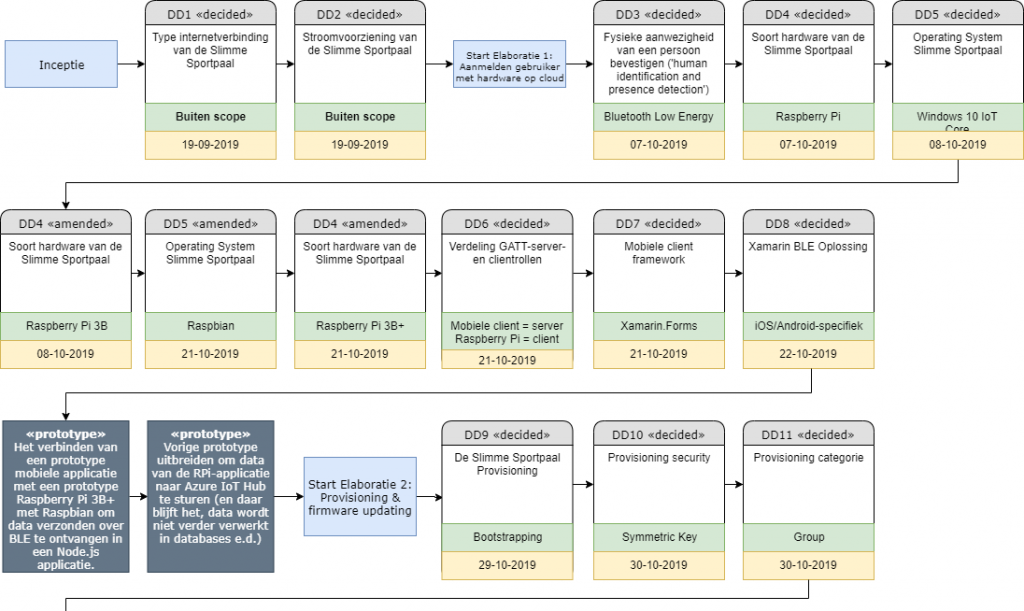
I worked “decision-centric”, meaning that one decision was based on another. I kept a timeline of decisions that I took, as well the problems they addressed in what they call a “decision chronology view”:
It’s all in Dutch and I won’t be remaking it in English for this blog post, sorry.
The blue blocks are the iteration and the phases. The colorful blocks are the decisions: the code, a short description, the decision I took and finally, the date of the decision. The grey blocks are the moments where I validate the decisions I took so far, by writing a prototype application. The prototypes are incremental, meaning that they expand upon previous prototypes I’ve written, just to make sure everything still works.
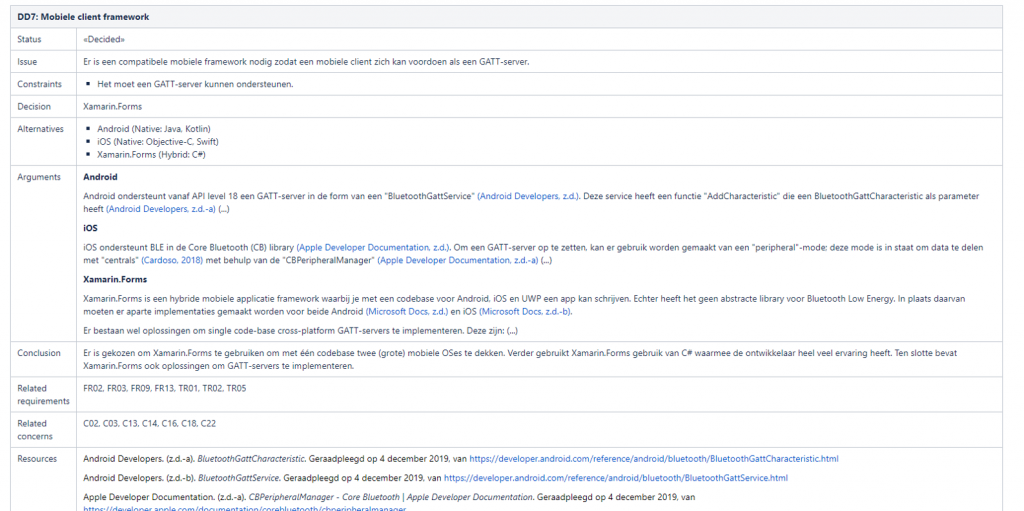
The decisions themselves were basically mini-researches. Here’s an example, with some of the text trimmed for brevity:
An example of a decision. Imagine this, but 22 of them.
In the decisions, I basically addressed an issue with constraints, listed some alternatives, then started researching those alternatives. Eventually, based on the results and the constraints, I came up with a conclusion and moved on to the next decision. Finally, for good measure, there are references to requirements, concerns and sources.
The most crucial part is the “arguments” part, where I write down facts while linking appropriate sources. Because I was working in an online environment, I could place links so that anyone else could just check them easily.
Because I documented my decisions so thoroughly, it is pretty easy for other developers to re-trace my steps. They can also understand why I took certain decisions in my final architecture.
Final architecture
I won’t be describing the full architecture as it’s much more complicated than it actually is, as I also implemented other major features: automatic “over-the-air” updates with a working deployment pipeline, as well as provisioning new IoT devices. The simplest way to describe the “happy flow” of my architecture for regular users is as follows:
The IoT Device (Raspberry Pi) receives Bluetooth Low Energy data with the user id of the user from the mobile app, and sends it to the Azure IoT Hub.
Azure IoT Hub sends said data to Azure Cosmos DB, starting or ending a “session” for said user.
This change is shown in the mobile app in real-time by using Azure SignalR (basically websockets).
The mobile app has a very simple account system which also makes use of Cosmos DB. Users can create an account and log in/out.
Closing words
This final internship was extremely educational. Throughout the architecture process, I had to research a lot of IoT and Cloud theories, so I learned a lot about both. The satisfying part is that I came up with the architecture on my own. However, I think the architecture has the potential to be even better. If I had discussed it every now and then with senior colleagues, I think we would find some improvements. The building blocks I used are just a metaphorical drop in the ocean, after all, and I didn’t have the time to study every single drop available to me.
The nice thing about working in the Cloud is that I could fully focus on developing the application, rather than deploying hardware, databases and servers on-premises. Thanks to the Cloud, I managed to create a solution which would probably take over a year to develop from scratch, incurring the necessary costs as well. Not to mention that because I went “serverless”, I don’t have to maintain any servers; Azure automatically updates the used software for me.
After I finished the final project, I took a 4 week break. Ever since last week, I started working as a junior software engineer at the company I did my final project at. To me, it’s definitely a good and exciting start of a new career!
The semester Advanced Software Development (ASD for short) had an assignment which requires me to write a blog about me exploring a new programming paradigm besides the typical one thought at school (object-oriented).
We had the choice of picking one of the following five languages: Prolog, Scala, Erlang, Clojure and Haskell. Last year I picked Haskell with its functional programming paradigm, but due to time constraints, I couldn’t finish the assignment in time. Instead of trying something I’ve already done once, I thought I should pick something different and see what the other languages are like. Thus, I decided that this time around, I would look into Prolog.
The assignment consisted of three parts:
Picking a language and paradigm (already done that)
Writing (IT) blog posts about my experiences and opinions related to this selected language and paradigm, while working my way through the Prolog chapter in the book “Seven Languages in Seven Weeks” by Bruce A. Tate (referred to as “the book” from now on). Conveniently enough, I already have this blog in a rather unknown corner of the internet I can use. At times, I will also try to compare various features of the language with the programming languages and paradigms I already know.
Defining a challenge befitting the selected language and paradigm and blogging my hardships and problems along with it.
Prolog
Prolog is a logic programming language. Various resources on the internet mention that it’s good for Natural Language Processing and Artificial Intelligence, but when I did a quick Google search on Prolog’s real world applications with the query “what can Prolog solve”, I most notably got puzzle-related results such as a Sudoku-solver. Admittedly, I could’ve worded that query better. For this assignment, I will use the same tool as the book uses: “GNU Prolog”.
The book mentions that data in Prolog is in the form of logical rules: facts, rules, queries.
A fact is a basic assertion about some world. This is the first time the book introduces the term “world”. I think another word for this could be “domain” or “context” or the likes. A rule is an inference about the facts in that world, while a query is a question about that world
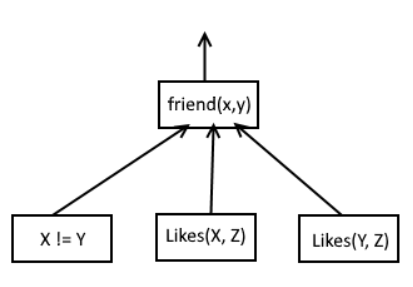
Example: likes
The book starts with a basic example:
Lines 1-3 are the “facts” while line 5 is a rule. Lines 1-3 define some very simple facts such as “wallace likes cheese” or “grommit likes cheese”.
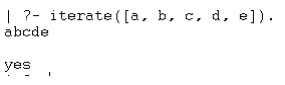
I saved this as a .pl file and then double clicked it to run it in GNU Prolog, because during the installation, GNU Prolog associated .pl files with itself. After running the file, I had the option to give my own input because I see an input cursor blinking after the “| ?- ” characters in my Prolog console.
I inputted my query as the following: “likes(wallace, cheese)” but after hitting return, all that happened is my cursor jumping to a new line. Moments later, I noticed that I was missing a period at the end of the statement. I suppose the “.” means “end of statement”, so that the user can input statements in multiple lines. Once I got the query correct, I got a “yes” as output. Changing the parameters a bit (“cheese” to “cheesea” which is supposed to be a typo) gave me a “no”. Yes and no – synonyms for true and false in the programming world.
Lines 1-3 aren’t very exciting compared to line 5. There is a lot to say about line 5 which I’ll try to keep short. According to the book, the rule is called “friend/2” which is a shorthand for “friend with 2 parameters. X and Y are the parameters in this case, while “:-” probably is Prolog’s assignment characters. Then you see three blocks divided by commas: “\+(X = Y)”, “likes(X, Z)” and “likes(Y, Z)”. The book says that X and Y cannot be the same, which is what “\+” is for it seems.
As for the “likes”, I assume they’re like function calls which return a yes or no. When the results of these three blocks is a “yes”, then you get a “yes” as the output of “friend”. However: nowhere in the “friends” call you specify “Z”. This rule checks that if two persons like the same Z (thing), then they are friends. What Prolog does there is check every single fact with Wallace and Grommit and see if they have a matching object they like. For example, Wallace and Grommit like cheese. Therefore, “friend(wallace, grommit).” returns a “yes”. You don’t specify “cheese” anywhere, Prolog “just knows” that they both like cheese.
For the sake of experimentation, I changed line 5 to “friend(X, Y) :- (X = Y)” This should mean that a person is a friend with itself. When I called this as “friend(wallace, wallace).”, I got a “yes”. This confirmed to me that a negation indeed is written as a “\+”.
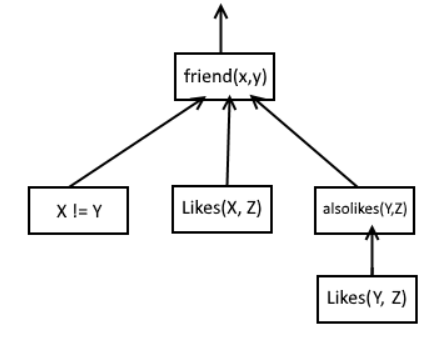
Interestingly enough, the code example can be visualized as a tree of some sorts:
Where an arrow out is the output. And if at some point one of the arrows contains “no”, then the block the arrow is pointing at would also output a “no”. I imagine this can go infinitely deep. To test this I changed the example a bit, which also could be represented with the following tree.
Example: food
The book proceeds to a second example related to food:
A food has a type, and a food has a flavor. You find out if the food has a given flavor by querying for: the food, and the flavor. What the function does is check if a given food’s type and a given flavor’s type match up.
The book introduces a new keyword: “What”, then proceeds to call the fact as following: “food_type(What, meat).” which returns a prompt from the console: “What = spam ?”. From this point on, I can press ; to go to the next alternative, or a to list all alternatives. Prolog is telling me that spam is meat, but that there are more. When I hit ; I see “sausage”. But this is all executed in a fact. What about a rule, in this case, “food_flavor”?
When I call “food_flavor(What, sweet).”, I’m essentially asking “what food is sweet?” Then I get the following results: “jolt” and “twinkie”. This is actually pretty interesting because Prolog finds out if a food is sweet by looking at the given flavor, then searches the given flavor by matching a flavor’s food type with the food in food_type.
I like how this wildcard-like variable is called “What” because you can almost make it a humanly readable inquiry: What food has a sweet food flavor?
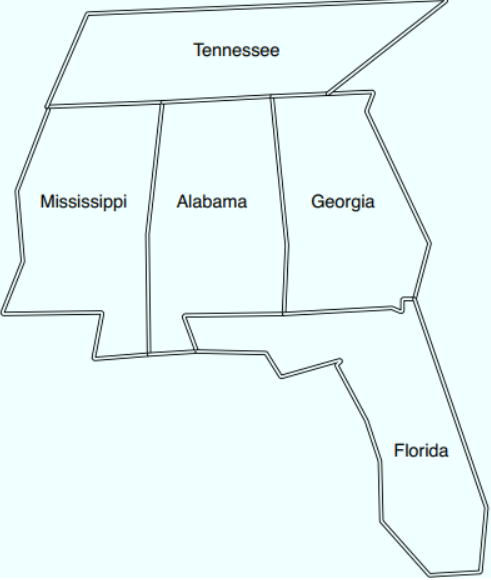
Example: Map coloring
The idea is that there are 3 colors: red, green and blue. Each state has a color but adjacent states may not have the same colors touching each other. So for example, Mississippi and Tennessee may not have the same color, or Alabama may not have the same color as its surrounding states. First all color combinations are defined in “different” as a fact. Same color combinations are not allowed. Calling this code: “coloring(Alabama, Mississippi, Georgia, Tennessee, Florida).” produces the following output:
Alabama = blue
Florida = green
Georgia = red
Mississippi = red
Tennessee = green ? ;
And 5 more combinations. The fact that it managed to find color combinations without any algorithm is something I have a hard time wrapping my mind around. All this code does is defining facts and rules and it manages to find all the alternatives. Yet I have a hard time understanding how the code really works, because the book doesn’t explain the code in-depth. Maybe I’ll figure it out later on when I have more experience.
Example: unification
This final example introduces a new character: the equals sign (“=”). In Java or C#, = is used to assign something to a variable (var x = 1). But in Prolog, it means “Find the values that make both sides match.” Calling: “dorothy(lion, tiger, bear).” produces the following output: “yes”. But calling “dorothy(One, Two, Three).” produces:
One = lion
Three = bear
Two = tiger
I suppose to “unify” one, two and three, Prolog ‘changes’ them into lion, tiger and bear, respectively. Same with X, Y, Z in dorothy – those three get changed into lion, tiger, bear when the rule is invoked. I guess that’s what is also happening at the map coloring example. The state names get mapped to red, green, blue, hence it output [State] = [Color]. It’s actually a unification output.
If I call “dorothy(One, Two, bear).” it only outputs:
One = lion
Two = tiger
There is no bear, as it’s already “the same”.
Thoughts so far
Prolog is quite interesting so far. It is somewhat reminiscent of a database where you have a bunch of records and you can execute queries, yet something feels ‘different’ about it. I still can’t wrap my mind around the Map Coloring example. I know one way or another, unification is involved, but unfortunately the book doesn’t explain it very well. It felt like that example was there for the sake of glorifying Prolog like “look at the kind of complicated problems Prolog can solve!”.
Yet, I believe in Prolog’s power. In the self study of day 1, I added my own challenge where I find all genres a specified instrument is used in, which could be done in 2 lines of code or so.
Compared to that, here’s the C# version I quickly put together.
Quite the difference, isn’t it? In Prolog I don’t need to define data structures or tie together two structures with an algorithm. Instead of that, all I need to do is define a rule.
Recursion
The chapter starts off with a recursive ancestor function. If it wasn’t recursive, I’m sure it’d be a huge chain of function calls instead, and the length of the chain would depend on just how deep you’d like to search. I imagine it would be a pain to maintain that list.
First thing I notice here is how a rule is defined twice. How does Prolog differentiate between these two? The book mentions that ancestor/2 has two clauses. “When you have multiple clauses that make up a rule, only one of them must be true for the rule to be true.”
I think in this context, a clause simply means implementation of a rule. So there are two manners to execute a rule: a simple lookup of the father, or a recursive lookup, and once one is successfully executed, there’s no need to execute the other. The book also says: “The second clause is more complex: ancestor(X, Y) :- father(X, Z), ancestor(Z, Y). This clause says X is an ancestor of Y if we can prove that X is the father of Z and we can also prove that same Z is an ancestor of Y.”
“zeb” is an ancestor of “john_boy_jr”. If I call “ancestor(zeb, john_boy_jr).”, I get a true. I think what happens is, behind the scenes, it calls the first clause which returns a false, it then calls the second clause. “father(X, Z)” returns a list of descendants of zeb, in this case just john_boy_sr. This is then used in the recursive ancestor call like “ancestor(john_boy_sr, john_boy_jr).” and will start evaluating from the first clause again. This time that evaluates to true, therefore, zeb indeed is john_boy_jr’s ancestor. It feels like the first clause in this case is the base case of the recursive function.
At first, I had difficulties understanding this. But writing it out step by step like this makes more sense to me. I now know that a rule can have multiple clauses and how recursion works.
Finally, the book also mentions we can use variables in a query, such as ” ancestor(zeb, Who).”. It immediately dawned on me that the previous day I mistook “What” for a keyword. Rather, it’s just a variable named “What” for context’s sake. In this context, the author decided to use “Who” instead because we’re talking about people. Unsurprisingly, I got the descendants of zeb, then the descendants of zeb’s descendants, and so on.
Lists and tuples
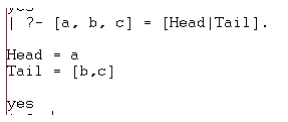
There’s not much to be said here. From what I gather by reading this book, a tuple is a list but has a fixed size and is written with (), e.g. “(1, 2, 3)”. Meanwhile lists have a pipe operator which can separate it into a “head” and “tail”:
I imagine that you can “iterate” through a list if you recursively keep splitting a list into a “head” and “tail” until you have nothing left. In fact, I did exactly that.
Which outputs:
What I find interesting about lists is that lists are like arrays, except they can be accessed in two parts: the head and tail. You don’t have that in C# for example. In C#, you could use an array index 0 for the head, but accessing the tail would require copying an array over to a new array without the head.
Challenge: Textonyms
In order to delve deeper in the language (and because the assignment requires me to), I have come up with a challenge: Write a ‘textonym finder’. Rosetta Code has a page dedicated to this, but has no code example for Prolog, which means likely nobody has attempted this in Prolog before. A perfect candidate for an original challenge. I might even submit this to Rosetta Code for fun.
Originally I had an even more complicated challenge, but it had proven to be too challenging: creating a word searching puzzle. You know, the ones where you have a list of words and a grid of letters and you have to find words in it. The way I wanted to approach this problem was as follows:
Define the horizontal and vertical width of the grid
Define the list of words which can be used
Define that each word can be used only once
Define that the words can be on a horizontal or vertical grid (not diagonal for now) in either direction
Define that the letters of those words can somewhat cross each other
The first two points are easy but things became really blurry from the third point on already, and I had no idea on how to solve this problem.
I have come across a similar problem which was a crossword puzzle solver. Solving crossword puzzles is essentially like generating a word search puzzle, except that word search puzzles don’t have blanks.
A crossword puzzle
Unfortunately I really had no idea where to start even for crossword puzzles, and a bit of searching gave me some semi-popular crossword Prolog problem where they ask you to solve a symmetrical crossword puzzle. Trying to tinker around with the solutions for that problem quickly proved to be in vain, even with the GNU Prolog manual at my side, because that manual doesn’t have any practical code usage examples whatsoever.
Thankfully, I had a backup-challenge in case the first challenge proved to be difficult: textonyms.
Textonyms
In order to find the textonym of a number, I have come up with the following steps which in theory *should* work:
Create a database of some words: ‘test’, …
Create a dictionary of key mappings: (a, ‘2’); (b, ‘2’), …
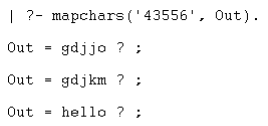
Input the numbers as a string (e.g. ‘43556’ which would result in at least a ‘hello’).
Split the numbers into a list: atom_chars(In, OutList)
Produce every single combination of the list of numbers. For example: 43556
maps to GDJJM, HEKKM, IFLLO, GELKO, IEJJO, etc.
See if any of those combinations exist in the words database.
(Optional: load the database of words from a text file)
First off, I mapped each character to a number:
Then, I defined some words:
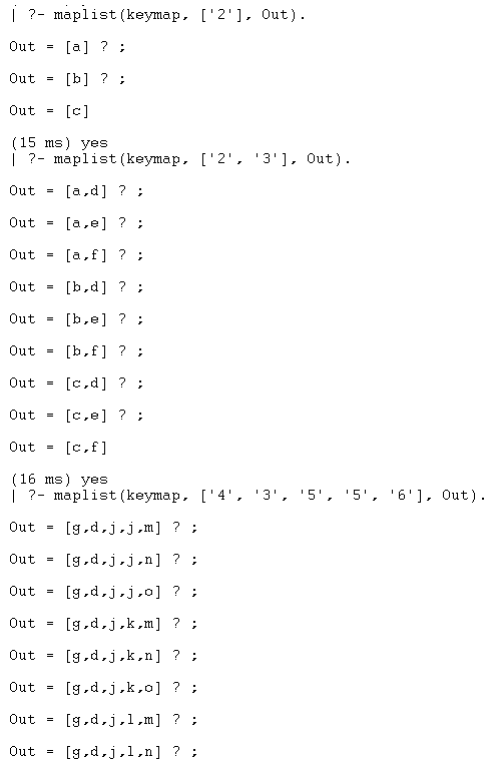
What I want to do is basically ‘map’ some numbers to a combination of characters. GNU-Prolog has a function exactly for that: maplist. This website seems to handle mapping extensively and shows many examples. One example that caught my interest is the following:
This is exactly what I needed, because I want to iterate over a list of numbers and ‘convert every character into something‘; applying a function on each element if you will.
In order to do that, I first had to write a conversion script. Actually, no, I didn’t have to, because I already have one: keymap. I can simply call it like this: keymap(Out, ‘9’). That’ll give me every single character that belongs to the number 9. I use keymap in maplist: maplist(keymap, [‘4’, ‘3’, ‘5’, ‘5’, ‘6’], Out).
Pretty much what I wanted!
I now have generated a list of all possible characters for a certain numbers with a single line of code, although it took me three days to get this far, because I spent most of my time writing a recursive function instead. Finding that maplist page is a blessing.
Next up, I’ll need to take this output and see if they exist in the database of words. For that, I’ll need to write a function which takes a list of chars as input and either put them together as a string, or splice up the words in the words database into lists of individual characters. The former sounds easier, so I’ll go with that.
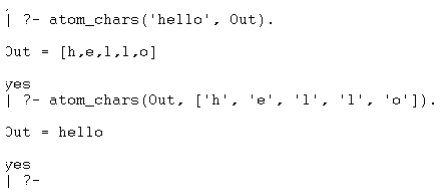
After a bit of looking around, I found a function called ‘atom_chars/2’. This can either combine or split characters to/from a string. This function is also handy in splitting the input number into a list of characters for the above function. Here’s an example of how it works both ways:
hello
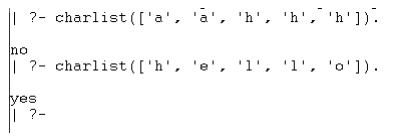
I used this function in my own function called charlist(In) in order to check if a list of characters exists in the words database:
charlist(In) :-
atom_chars(Out, In),
word(Out).
It can successfully detect whether ‘hello’ exists or doesn’t exist:
helloo
Now the tricky part: putting it all together. So far I’ve made a few building blocks, and it’s time to build something functional out of it. So far, this is what I put together:
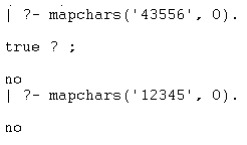
When I call mapchars with the number combination, I don’t get quite the desiredresu lt. Calling it with ‘43556’ (correct) and ‘12345’ (incorrect) gives me a boolean result rather than the matching word:
So close!
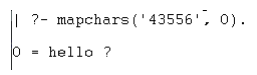
Somehow, I need to make it display the missing words. The function returns a boolean instead of the matched word. A eureka moment filled in the final piece of the puzzle: I need to return ValidWord from ‘charlist’ all the way back to ‘mapchars’, so I changed the final two lines. This is how the function looks like now:
And the function call:
Exactly what I wanted!
In the end, maplist saves the day! I expanded the database for entry 43556 some more with additional words:
And the result:
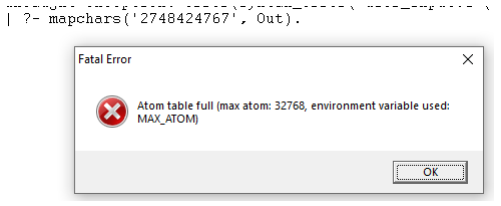
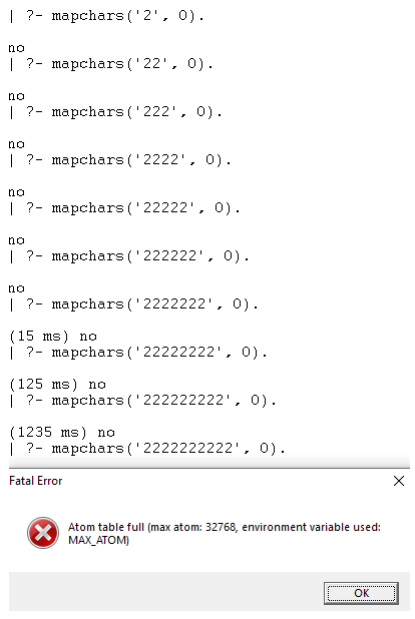
Curiously enough, GNU-Prolog is unable to tackle the first two words in the database due to environmental constraints:
I am unable to find a solution for this, even when I search for the exact word combination “Atom table full”. Out of curiosity, I experimented to find the limits:
The maximum amount of characters I can query is 9. Any more than that, and the program crashes.
Words database
To go an extra mile, I wanted to populate the database of words with a text file. I found a way to read files line by line into an array, but didn’t find a way to create facts out of those words. Unfortunately, I had to leave this out of the challenge due to time constraints.
This is how the end result looks like.
Interfacing and real-world applications
Prolog is an interesting language but I find it somewhat constraining that I have to work from the GNU-Prolog program. Right now this is more of an academical context, but what if I wanted to actually use Prolog in some of my applications? For example, how do I call Prolog from C# or Java? Or what if I want to make visual applications and not just CLI? In this post I will briefly look into various options. Note that I won’t distinguish between Prolog dialects (GNU/SWI-Prolog, and so on).
C#
Yield Prolog: Not exactly a Prolog compiler in C#, but it does add a “Variable” keyword which in combination with Prolog should simulate Prolog’s unification.
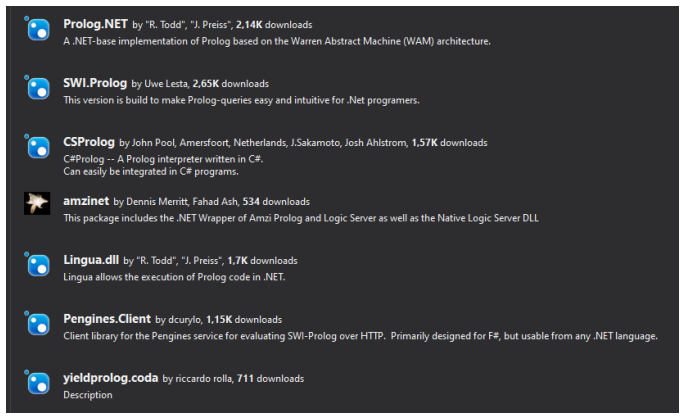
Also, it seems like NuGet also has a lot of Prolog-related packages, although the amount of downloads seem to be minimal:
Java
JPL: It seems to allow for embedded Java code in Prolog, and the other way around.
B-Prolog: This also seems to have a bi-directional interface with Java but also C.
SICStus Prolog: According to this page, you can embed SICStus Prolog in Java or .NET application servers.
JavaScript
Tau Prolog: A Prolog interpreter written entirely in Javascript. This means that you can place Prolog code in Javascript files and it’ll execute. There’s also a Node.js NPM package for it.
Use cases
There are various use cases for Prolog, which I will list below.
Although there are quite some Prolog-related content on the internet from communities, most of them seem to be tutorials or people asking questions. Some websites I come across also look like they’ve been written pre-2005. I have the feeling that nowadays Prolog is applied more in an academic context rather than modern-day applications and is slowly fading into obscurity.
One major annoyance I had with Prolog is how there are dialects (GNU/SWI) and how they seem to differ a bit in functionality. SWI Prolog shows up in searches more often so it makes me wonder why the Seven Languages in Seven Days book decided to go for GNU Prolog. There also doesn’t seem to be any official IDE for Prolog and debugging Prolog code is something I can only dream of .
It also feels like (at least GNU) Prolog is tailored for older machines, which I noticed when I tried to generate textonyms for more than nine numbers. Some websites also have ancient designs which kind of gives me the impression that Prolog is an ‘ancient’ language probably used in legacy systems nowadays.
Besides the annoyances, I found Prolog itself to be quite interesting, especially with unification being able to go both ways. For example, atom_chars can split an atom into chars, or merge chars into an atom. Normally in C# you’d have two separate functions for that. In Prolog you just define a variable and Prolog fills it in for you. That’s what my textonym-program mainly uses too. Although the opposite doesn’t seem to be possible (finding numbers for a word) because of the way I used atom_chars.
Truthfully, I just can’t help but have mixed feelings about Prolog as a language. Logical programming as a concept, however, is most interesting.
I’ve been meaning to write a post after releasing the most recent version(s) of my assembly (ASM) tutorials, but never got around to it until now. Here’s a shameless plug of the tutorials in question:
If you’re an SNES ASM hacker, chances are that you’ve heard about these. So yeah, I’m the author (if that wasn’t obvious already, hehe).
Here’s a picture of an outdated physical version which I printed out with the remainder of my high school printer credits before graduating back then. Gotta put that money to use somehow!
History and idea
“Ersanio’s ASM Tutorial” is an idea I came up with all the way back during my highschool years. SMWCentral’s archives show that my very first ASM tutorial thread was made in November 2008. I was 16 back then.
I learned ASM because of people like Ghettoyouth and Bio. They were pumping out incredible ASM work and it really fascinated me. I didn’t know a thing about programming but I was set on learning ASM anyway. However, there was a problem: because the ASM field was rather young, documentation was difficult to find.
After a lot of searching on the internet, as well as repeatedly asking for help from people who knew ASM, I finally learned ASM myself. It was a tough journey but in the end it all worked out. Yet, I was still a bit bothered by how scattered the information was. I saw people who are willing to learn ASM, but had hard times because of how information was scattered. At the same time, I felt bad for people who knew ASM because I’m sure they’d be bombarded with ASM-related questions… including myself. That is how I came up with the idea of making an ASM tutorial. In a way, I wanted the people to experience my passion as well, so this tutorial would be some kind of a helping hand for people who wish to learn ASM.
Writing my ASM tutorials
Writing my ASM tutorial was actually challenging, because the target audience are people who don’t know ASM. It’s very hard to imagine the things the audience doesn’t know because you yourself know ASM already, so some of the knowledge is “common sense” to you as the writer. This kind of tutorial is one which teaches the audience a “skillset” rather than a “utility”; if I were to write a custom block inserter tutorial instead that would’ve been easy, because the tutorial would be about how the tool works. It teaches the reader a “routine”. On the other hand, teaching a skillset such as ASM is like telling the reader that there’s a bunch of abstract concepts and you need to somehow combine them to achieve a result.
This shouldn’t come as a surprise, but first and foremost, when you write a tutorial, make absolutely sure that there are no mistakes whatsoever. You wouldn’t want to teach the reader false information. This is the most important rule I followed.
When I started writing my ASM tutorial, I simply wrote a bunch of topics as chapters (kind of in the order I learned them), then started filling them with content. I asked for a lot of feedback from people who both know and didn’t know ASM which was a huge help.
There was a balance I needed to keep while writing the tutorial. When I wrote the ASM tutorial, I wanted to exactly explain what happened behind the scenes when you execute a certain piece of code, but this has the risk of making the tutorial extremely verbose, as well as introducing advanced concepts very early on in the tutorial. Here’s an example of seemingly simple code which could suffer from that problem:
LDA #$01 STA $19 RTS
In the context of Super Mario World, this is simply giving the player the Mushroom powerup status. But what happens behind the scenes in ASM is much more complicated:
A is in 8-bit mode
The direct page register is $00
The data bank register is $00
What is RTS? Return? To where?
The processor flag ‘zero’ is cleared
This is a lot of information to introduce to a beginner so I had to keep it to the bare essentials, often simplifying such information to things like “when the address is between $7E0000-$7E00FF, you can simpify it to $00 to $FF” because this is the most common use case scenario of direct page.
Another important thing to keep in mind when teaching a skillset is the usage of examples. You could write down a lot of facts, but without examples it wouldn’t stick around the reader. It’s a chance to get the reader involved and make them think about code. Visual aid can also be helpful, such as a visual representation of the stack.
Interestingly enough, having a good vocabulary also helped me improve my ASM tutorial a lot. An extensive vocabulary helps you with conveying information in a more understandable language. In the beginning my English wasn’t the greatest, but that didn’t stop me from writing the initial versions of my ASM tutorial. As my English improved, I found that some of the things I have written were of poor quality. I essentially ended up almost entirely rewriting my ASM tutorial because of this, but I think it was very worth it.
Future
Very recently I came across this online book sort of thing: Model-Based Machine Learning. Machine learning is interesting in itself but what interested me more is the format of this book. I really like how you can just click through the book and how it’s organized. I’m not sure if they used some kind of tool to generate this online book, but maybe I’ll put my ASM tutorials in this format as well one day even if I have to do it manually.
Closing words
I would like to believe that my ASM tutorials were of great contribution to SMWCentral. However, I didn’t expect it to be recommended in other communities as well. p4plus2 and Raidenthequick mentioned how my tutorials are being used in other communities as well and I was really amazed by this.
I think it’s safe to say that both of these ASM tutorials are my proudest work in my hobby of ROM hacking.
I’ve been meaning to write this post for a while now, but I never got around to it until today.
Recently, p4plus2 and I released a new SNES project – an inflate algorithm for the SNES. It is capable of decompressing DEFLATE files, and the code is some serious wizardry.
Without further ado, here’s the C3 thread: http://www.smwcentral.net/?p=viewthread&t=94324. In here are all the data we found as well as a brief explanation of the format and possible applications.
Before last C3, I came up with the idea of porting a certain piece of 6502 code to the 65c816, i.e. Super Nintendo Entertainment System. It’s an inflate algorithm written by Piotr Fusik. A few years ago (really), p4plus2 linked me this and I forever stashed it in my “projects to do” list, not really understanding what DEFLATE really does. At least, until very recently.
After my latest semester I’ve learned about graphs and trees and this is exactly what DEFLATE uses – a Huffman Tree. I finally started to understand what DEFLATE really is and found lightweight tools to compress data so now I have things to test. I told p4plus2 about the idea of porting DEFLATE to the SNES and he told me he’s been wanting to do this also, so this became some kind of a collaboration project. Ultimately, I wanted to implement this in Super Mario World as I know that some hack collabs suffered from ROM space issues. There are solutions (such as bankswitching using the SA-1) but solving the problem without any enhancement chips sounded more challenging.
The initial approach
At first, I thought it’d be a matter of “porting an old processor’s opcodes to its successor’s opcodes” which would give it some kind of a performance boost simply by utilizing newly-added opcodes, so you wouldn’t need to “beat around the bush” anymore when you wanted something done. For example, the 6502 doesn’t have stack instructions for the index registers, so you would need to transfer the index registers to A first, then push that using PHA. That’s two steps for a push. In the 65c816, you can simply use PHY or PHX. The first thing I did was making sure the 6502 code worked on the SNES without any optimizations whatsoever. This worked, but then p4plus2 took this project to the next level.
Benchmarking decompression algorithms
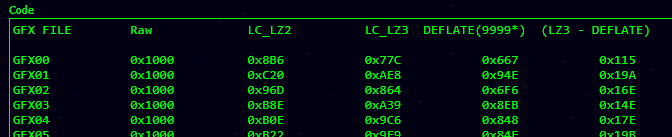
p4plus2 has ways to measure code performance on the SNES by using a custom-built SNES debugger. He measured them in “clocks” and we used a compressed GFX00.bin as our test file.
The ported 6502 code used 7415572 clocks (~21 frames). 21 frames might not seem a lot but consider the fact that I want to port this to Super Mario World. Super Mario World can load up to 11 graphics (GFX) files per level, so that’d be roughly 231 frames, give or take a few depending on how well the files are compressed. That’s almost 4 seconds on the level loading screen just for decompressing GFX files. The original SMW decompression algorithm (LC_LZ2) already bothered me to the point of initiating a very successful ASM collab to optimize the LC_LZ2 algorithm.
By p4plus2’s request, I made a bunch of “wrapper” homebrew ROMs which ran various decompression routines on GFX00.bin. I compressed GFX00.bin into LC_LZ2 and LC_LZ3 and ran three decompression algorithms on it: SMW’s original LC_LZ2 decompressor, the highly optimized LC_LZ2 decompressor and the LC_LZ3 decompressor which was based on the highly optimized LC_LZ2 decompressor. p4plus2 benchmarked the ROMs (including the ported 6502 inflate code) and got the following results:
The results kind of scared me. The inflate routine would need a LOT of optimizations. What’s more, p4plus2 recommended that we just start over from scratch so that we would have full control over the code. Making small changes would require us to make many changes in several places in the source code sometimes. To check if this project is worth it at all, I decided to compare DEFLATE to other formats.
Comparing various compression formats
(Admittedly I should’ve done this step before even starting the project. What if the compression format was inferior?)
I compressed all the GFX files of SMW in DEFLATE using zopfli and compared them in other compressed formats in order to see if DEFLATE is a superior compression format or not.
The results were incredible as the compression format beat even LC_LZ3 which is considered an “upgrade” of LC_LZ2:
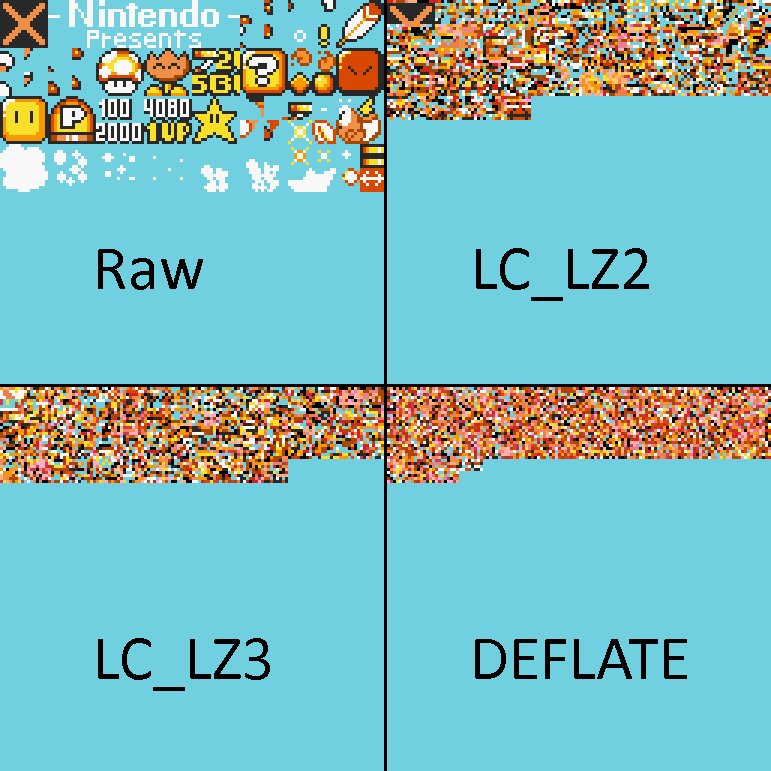
As you can see, DEFLATE saves hundreds of bytes compared to LC_LZ3. When you count all GFX files, DEFLATE saves 0x4A53 bytes total compared to LC_LZ3, which is a HUGE improvement within the context of SNES ROM space. It’s funny to see the compression graphically as well:
In LC_LZ2 you can still see some of the original graphics just slightly distorted. LC_LZ3 is even more distorted. Then you have DEFLATE which is just… a garbled mess. You can see that every single byte is processed one way or another, thanks to the Huffman coding.
Code with momentum
p4plus2 decided to rewrite the routine from scratch and I applaud his fortitude. As I still have trouble understanding DEFLATE I mostly had a supporting role including finding optimization points in the code, suggesting edits, minor optimizations to his code and pretty much brainstorming with him in general.
At first, p4plus2 wrote the code unoptimized but in such a format that it would be easy to reformat it to an optimized form later. Many existing implementations generated the static tree dynamically in the RAM but we decided to just put the static tree in the ROM. After applying many optimization tricks, we got the code down to 4753212 clocks, from 7695346. It still doesn’t beat the previously mentioned decompression routines, but it’s one hell of an improvement.
Optimization tricks
p4plus2 already had experience with optimizing SNES code as he worked on a few TASbot projects before, which also required insane amounts of optimizing. Most of the optimization was pretty ‘basic’, such as unrolling loops, inline functions rather than function calls, direct copy being DMA’d rather than block moved and switching around branches so that they are taken less often. We also removed some obsolete opcodes (such as CLC/SEC) which required a bit of code analyzing and experimenting.
The most interesting optimization tricks used are messing around with the stack pointer and honestly I think that’s entering black magic territory. Take a look at this code:
An inexperienced ASMer would immediately notice that there’s a pull without a push. That would cause the program to crash! …But there are strings attached. First of all, this entire code is in 16-bit mode as mentioned earlier. Second, code_length_codes is a table with 16-bit values and the stack pointer is set to that. As the stack pointer is a 16-bit value, it can also point to bank 00 of the ROM. Finally, PLX increases the stack pointer by +2 (as we’re in 16-bit mode). As a result, this code reads out the bytes and stores them in the RAM addresses defined in the code_length_codes table. Every PLX is basically shorthand for a bunch of instructions which read out code_length_codes, transferring it to the X register, then increasing the code_length_codes index by 2. This is quite the extreme (and clever!) optimization but it was possible as the stack wasn’t used in this area.
The second extreme optimization also involves the stack pointer register as well as a bit of the direct page register. There’s no stack pulling magic here, however.
This routine is the main bottleneck of inflate. It’s called hundreds of times so it only makes sense to optimize this routine as much as we can, even if it means shaving off 1 cycle at a time.
First, we used the direct page register to clear the accumulator because it’s always nice to assume the direct page register is set to 0000h. Then we basically used the stack register for scratch RAM purposes. It’s faster than using actual scratch RAM. A TCS/TSC takes two cycles while doing an “LDA $dp” or “STA $dp” in 16-bit mode takes four. Also, a TDC takes two cycles while an “LDA #$0000” takes three. Because the routine gets called hundreds of times, the optimizations are pretty much hundreds of cycles!
Future projects
With the recent developments on the SA-1 chip thanks to Vitor Vilela and his SA-1 pack, the possibility of an SA-1 port is very real. This would mean that the inflate code could run even faster with minimal modifications to the code itself. What’s more, inflate could be optimized even more with a barrel shifter and SA-1 just happens to have one.
Personally I would also like to make a SuperFX port of inflate so that the Yoshi’s Island community would be able to benefit from the compression, although compression tests show that LC_LZ16’s compression is superior in some cases. I don’t think this will hold me back, though. As I don’t fully understand the DEFLATE format yet, I plan to write inflate in C# first to grasp the essentials of the decompression algorithm. After I truly understand how inflate works, I could give the SuperFX version a serious attempt. I know that if I were to write one right now, with my current knowledge, all I would do is take the SNES code and port it to SuperFX like some kind of a tool.
Closing words
This is possibly the grandest SMW hacking ASM projects I’ve worked on so far. I’m really glad that me and p4plus2 worked on this project together. If I tried this solo, I would’ve simply ported the 6502 code and called it a day (but the project technically would’ve been successful)!
There were so many steps involved. It wasn’t a matter of “oh I got the idea to code LevelASM, I’ll just code it real quick” but it actually required careful planning, experimenting and a solid understanding of the algorithm.
In my opinion, this project is very revolutionary for SNES ROM hacking in general and I hope that other people will find even more optimization points. Furthermore, I hope that FuSoYa officially implements this in Lunar Magic once there’s a working SA-1 port.
Thanks to p4plus2, I learned new (optimization) tricks for the SNES. I also confirmed my suspicions that he is an actual wizard.
The namesake is inspired by “Snes9x” (I never knew what the 9x really meant). I didn’t want to simply call it Super Chip-8 because there’s a variant of the Chip-8 called SCHIP (Super Chip) and it could cause confusion, and conveniently enough the name already had a number so I just stuck an “x” at the end.
How the idea came to be
Writing a (crude) SNES emulator has always been on my wishlist – so I started doing research on the SNES as well as emulation in general. Google seems to have taken notice of my emulation-related searches. During my daily routine of checking the Google app for stories to read, it suggested to me this certain article:
Upon seeing the title alone, I had three questions in mind: “What is Chip-8”, “what is Rust” and “what is WebAssembly”? I looked into the former and found out it’s basically some sort of a “fantasy video game console”. That immediately made me forget about the latter two questions.
I seem to have a soft spot for emulation, assembly and old/retro consoles in general. So when I read about the Chip-8 I noticed how simple it was (it’s considered the “hello world” of emulation) and I got really into the idea of writing an emulator for this. Then I found out there’s already like a thousand emulators for this. It was then that I had this impulsive thought: The Chip-8 is so simple, it could probably run even on the SNES. Amused by my own idea, I set up the project directory.
Setting up the project
To work on this project, all I needed are three tools:
And… that’s about it. The rest was up to my coding and problem-solving skills.
Actual coding
Prior to this project, I had never finished a SNES homebrew ROM before. The greatest extent of my homebrewing is activating the screen and displaying things, but in terms of gameplay or controller inputs, I did nothing. This was going to be a whole new experience. I decided to approach this project in my own way – take a really safe approach and define every RAM address, and (almost) every magical number. I also decided to not optimize the code, because I think I would’ve lost control over my code really fast if I did that from the very beginning already.
The display of the Chip-8 is 64×32. The display of the (NTSC) SNES is 256×224 by default. p4plus2 gave me the idea to make the screen mode 7. It has a very simple graphics format (1 byte per pixel basically) and you can scale the screen, so I could make the Chip-8 display 256×128. People won’t have to squint their eyes when using the emulator, at least. Because the (scaled up) horizontal resolution is a perfect 256 pixels wide, I decided to use HDMA to color the screen boundaries.
In order to emulate the Chip-8, I had to allocate some RAM for its registers.
These are all in the SNES direct page (except for the memory), which would allow for slightly faster access to the registers.
I also allocated some RAM for opcode parameters. Each opcode could be ‘dissected’ into 6 variables: The opcode itself and 5 parameters. All of these variables are filled in regardless of the opcode currently being processed.
Inside the main game loop, I added a subroutine call to an opcode parser. Because every opcode is exactly two bytes, it was a matter of reading an opcode, then increasing the program counter by 2 to get to the next instruction.
I made use of a pointer table which is used by !Opcode. Each opcode will have its own function, but there are certain opcodes which act as a ‘container’ for another group of opcodes. The greatest example is opcode $08 – “Arithmetic”. The SNES – in my opinion – is pretty okay with pointer tables, and I had no problems with making yet another pointer table for those specific container opcodes.
My biggest problem was thinking of a proper solution for the Chip-8 input. Officially, the system has sixteen keys. The SNES only has twelve and you can’t use all 12 for conventional input. Start and select are in the middle of the controller and you’ll have to reach them with your thumb, forcing you to stop using the D-pad or the ABXY buttons. This leaves you with 10 buttons, and there’s no real way to divide 16 buttons over 10 buttons.
Then I got the idea of using button combinations. You could map the 16 keys to the ABXY buttons by using button combinations with the L+R buttons:
ABXY
L+[ABXY]
R+[ABXY]
LR+[ABXY]
However, using this controller scheme for every single ROM would be very as awkward and uncomfortable. So I got the idea to make a custom controller scheme for every playable ROM.
It involved extra work, but in the end, it was worth it. Technically the emulator supports all 16 keys, but at the same time, you can set intuitive controls for each playable ROM.
Closing words
In the end, I am surprised at myself for being able to complete this project at all. I think the very idea of coding an emulator for the SNES kept me going on. Personally, I think it’s a pretty crazy idea.
SMWCentral’s C3 event was also nearing so I thought it was the perfect opportunity to finish a project and show it off to everyone.
The fact that I can tell people that I coded an emulator for the SNES, no matter how simple the Chip-8 system may be, is something that I can be proud of.
Most SNES ROM hackers probably have realized how limiting the SNES sometimes can be. You can only have 8 (H)DMA channels, the amount of OAM tiles on the screen is limited (think of the 33’s Range Over and 35’s Time Over limitations), the VRAM sometimes is small when you have a level with many varying graphics, etc. I guess that is understandable. Consoles didn’t have that much processing power back in the days due to limited technology, which was possibly also expensive.
Limited ROM space is also a major downer. Nintendo fit an entire game into a 512kB ROM – Super Mario World – using various tricks. They used LC_LZ2 compression, Reduced graphics from 4bpp to 3bpp, they used RLE compression, etc. They could only afford so much ROM space. As time passed, ROMs got bigger and bigger but the ROMs were still small enough to not unlock the extreme potential of the SNES (like allowing movie sequences and/or making quick time-event games).
The PPU registers are also pretty limiting. Certain registers can only be written to during V-blanks (like writing new graphical data). Write too much and you risk flashing scanlines at the top of the screen.
Sometimes, certain SNES limitations could be bypassed. There were enhancement chips which allow bankswitching for more ROM space for example, or chips which allow you to write bitmap data directly like the SuperFX. However, even with the enhancement chips, some limitations just don’t change. You can’t increase the amount of audio channels, you can’t increase the amount of layers, you can’t increase the amount of sprites shown on-screen, etc.
Finally, coding for the SNES has always been a pain to begin with. You code in ASM (Assembly). You write a bunch of LDAs and STAs and hope things work out. It’s very unreadable.
A question I had in mind for a long time is “How do I overcome the SNES limitations?” Of course, there are multiple answers for that, ranged from something as simple as “just don’t attempt it” to “even if you overcome it, it’ll have limited practical use”. So I decided to look at it from another point of view – emulators.
It should be possible to modify emulators to include less limitations, but the concept of “ROM hacking” wouldn’t remain the same anymore. Sure, you can allow 512 or more layers, but obviously this won’t run on the actual SNES. It’ll pretty much be like building your own game engine, and you’re still limited to ASM of course.
This idea gave me another idea. How about building a game engine based on the SNES’ hardware, but with its limits gone? You’d have infinite graphics space. You’d have infinite layers. You’d have infinite music channels. Infinite palettes, etc. You can have as many HDMA channels as you want affecting layers, brightness registers, and so on. You won’t have to allocate RAM for variables manually (because declaring variables in a high-level language just picks a free RAM address for you). You can display as many sprite/OAM tiles as you want to display as long as your graphics card can handle it. And so on.
For example, want a level with very neat parallax scrolling? Pick 5 layers with 4bpp graphics. Or pick 5 layers with 8bpp graphics with one set of palettes for each 8bpp layer. Or you could have a mode 7 background while you have a fully playable level.
Only question is, how would this be built? Take bits and pieces from emulators and make your own engine, or start completely from scratch? Personally I’d attempt the former, but I wouldn’t even know in what language to start. Oh well.